Monthly Archives: March 2022
Send Social Media does everything Hootsuite does, but significantly better in addition to other features Hootsuite simply doesn’t offer.
![]() 1. Schedule posts to over 30+ social networks – not just 5 Schedule and posts tweets, Foursquare shouts and venue tips, LinkedIn status updates, LinkedIn Group posts, personal messages, as well as WordPress (self-hosted), WordPress.com, Blogger, Posterous and Tumblr blogs, Pinterest pins, Instagram, Flickr albums, Email Newsletters and even SMS/text messages. That’s just scratching the surface as you can add over 30+ more social networks.
1. Schedule posts to over 30+ social networks – not just 5 Schedule and posts tweets, Foursquare shouts and venue tips, LinkedIn status updates, LinkedIn Group posts, personal messages, as well as WordPress (self-hosted), WordPress.com, Blogger, Posterous and Tumblr blogs, Pinterest pins, Instagram, Flickr albums, Email Newsletters and even SMS/text messages. That’s just scratching the surface as you can add over 30+ more social networks.
![]() 2. Better Analytics, analyze every post, click, share & comment while also checking your Klout score Track just about everything including clicks, referrers, shares, comments, views and more. Track every piece of content you distribute, making it easy to measure the success of your campaigns. You can even add your Google Analytics code. Get reports on various metrics including fans/followers over time, engagement, klout, sentiment and more.
2. Better Analytics, analyze every post, click, share & comment while also checking your Klout score Track just about everything including clicks, referrers, shares, comments, views and more. Track every piece of content you distribute, making it easy to measure the success of your campaigns. You can even add your Google Analytics code. Get reports on various metrics including fans/followers over time, engagement, klout, sentiment and more.
![]() 3. Better Monitoring, track and easily respond to your Yelp and City search reviews Monitor what’s being said about your brand on blogs, news, social networks and in comments. Your sentiment analysis highlights which mentions you should respond to. You can also review your latest Yelp and CitySearch reviews so you can respond right away.
3. Better Monitoring, track and easily respond to your Yelp and City search reviews Monitor what’s being said about your brand on blogs, news, social networks and in comments. Your sentiment analysis highlights which mentions you should respond to. You can also review your latest Yelp and CitySearch reviews so you can respond right away.
![]() 4. Customer Database included letting you engage with them all easily Access all your social, email and mobile contacts in a single, unified address book. Import your contacts from all the services you use including Gmail and LinkedIn. Create profiles and groups for each contact you import, allowing you to reach them on whichever platform you choose.
4. Customer Database included letting you engage with them all easily Access all your social, email and mobile contacts in a single, unified address book. Import your contacts from all the services you use including Gmail and LinkedIn. Create profiles and groups for each contact you import, allowing you to reach them on whichever platform you choose.
![]() 5. Unlimited Collaboration Tools to manage multiple users and clients Manage accounts for multiple clients and/or contributors while creating logins allowing them to manage things themselves. Create user hierarchies and manage permissions. This is a great solution for agencies needing to manage multiple client accounts and perfect for businesses with small teams. Your users have the option to log in and manage things themselves or you can manage everything for them.
5. Unlimited Collaboration Tools to manage multiple users and clients Manage accounts for multiple clients and/or contributors while creating logins allowing them to manage things themselves. Create user hierarchies and manage permissions. This is a great solution for agencies needing to manage multiple client accounts and perfect for businesses with small teams. Your users have the option to log in and manage things themselves or you can manage everything for them.
![]() 6. A better calendar style layout that actually lets you see your scheduled posts overall Have a true calendar layout to easily view all your scheduled posts for editing. Access the interactive drag-and-drop calendar to easily plan your message schedule.
6. A better calendar style layout that actually lets you see your scheduled posts overall Have a true calendar layout to easily view all your scheduled posts for editing. Access the interactive drag-and-drop calendar to easily plan your message schedule.
![]() 7. Now you can send 160-character SMS texts to any network in the world Send customers promotional codes and announcements about deals and sales or integrate SMS into your own applications. Sending an SMS text is as simple as typing your message and deciding where to send it. Add a sign-up widget to your website to gather new mobile numbers and potential customers.
7. Now you can send 160-character SMS texts to any network in the world Send customers promotional codes and announcements about deals and sales or integrate SMS into your own applications. Sending an SMS text is as simple as typing your message and deciding where to send it. Add a sign-up widget to your website to gather new mobile numbers and potential customers.
![]() 8. Manage all your social streams from a single inbox Like, Comment, Share and Delete posts in your stream from services like Facebook, Twitter and LinkedIn. Easily manage your Twitter stream, lists, search terms and followers. View detailed information about anyone on Twitter, including Klout scores and influencers. Keep track of mentions, search terms, retweets and more.
8. Manage all your social streams from a single inbox Like, Comment, Share and Delete posts in your stream from services like Facebook, Twitter and LinkedIn. Easily manage your Twitter stream, lists, search terms and followers. View detailed information about anyone on Twitter, including Klout scores and influencers. Keep track of mentions, search terms, retweets and more.
![]() 9. All the Twitter Features you love and more! Manage and track all your Twitter profiles in one place. Read and respond to your Twitter stream in real-time or schedule tweets to go out later. Setup auto-responders, auto-follow and unfollow keyword targeted users and more!
9. All the Twitter Features you love and more! Manage and track all your Twitter profiles in one place. Read and respond to your Twitter stream in real-time or schedule tweets to go out later. Setup auto-responders, auto-follow and unfollow keyword targeted users and more!
f you’re a marketer or team member of a business that utilizes social media as a marketing channel, chances are one of your responsibilities is sharing how social is performing for the business with internal stakeholders. And if you run or are part of an agency that offers social media marketing services, your clients likely want to know the results they’re getting on a monthly basis.
One of the elements that make social media marketing so interesting and very effective when done well is it’s something that occurs across multiple platforms. While that’s great for driving marketing results, it’s not so great when the time comes to compile all relevant data into a report that people who aren’t involved in this practice can easily understand. Since reporting is something that has created headaches for people involved in all facets of social media marketing, the good news is there’s now a much easier way to handle this task.
Thanks to the powerful functionality and features we’ve built into Send Social Media, creating excellent social media reports is now a breeze. This is just as true for business owners focused on their operations as it is for marketers and agencies managing multiple clients. Let’s take a look at how Send Social Media can help streamline all of your reporting activities:
All the Data You Need at Your Fingertips
As mentioned above, one of the reasons social media reporting has always been viewed as a very time-consuming activity is it requires pulling data from multiple sources. With Send Social Media, you can say goodbye to doing this work manually. Since all of the profiles you’re managing are already connected to this software, we’re able to pull all the data into a central location.
While having all your data in a single dashboard is a big timesaver, it’s just the tip of the iceberg with what Send Social Media offers for reporting. Not only will you be able to build reports that look great based on the specific needs of your business or clients, but you’ll be able to use all of this centralized data to spot actionable insights.
For example, you can see exactly which posts are performing the best. You can then take this information and directly use it to guide future social media marketing efforts. Another use of this data that Send Social Media makes easy is identifying users who are the biggest brand advocates. Best of all, these different examples we’ve shared can easily be exported into a PDF and then shared with stakeholders or clients.


If you want to see just how much time the reporting features of Send Social Media can save you, head over to our plans page and then sign up for the one that’s right for you
Using Send Social Media’s social media management platform, we’ve made it even easier for you to share photos and files by making our upload process handle multiple files at once. This means you no longer need to wait for each file to finish uploading before adding another.In this post we’ll show you how you can save time by using this new feature. Learn how to Upload Multiple Files and Photos at once with Send Social Media:
1. Open the Message Box and choose Photo or File.

2. Choose the files you want to upload.

3. Hit Open.

You will now see your files download one by one by themselves, leaving you to get on with writing your message.
NB. Please note that this new upload process uses Flash. You also have a limit of 1.5MB per file and may upload up to 10 files for each message.

One of our most popular feature requests has been the ability to assign tasks to team members and manage the approval workflow from within Send Social Media. We’re excited to announce that this feature is now available on all of our multi-user plans! Team administrators can now specify exactly which user needs to approve content before it gets published. Learn how Team Members can approve content before it gets published with Send Social Media:
To configure a workflow for a user, follow the steps below:
1. If you haven’t already done so, sign up for a Send Social Media account that allows you to manage multiple users/clients.
2. Go to My Users and either create a new user or edit an existing one.
3. You will now see an Approval Worfklow section. Click edit to define who this user needs approval from before they can publish content.
4. Follow the steps to Save or Create the user.
5. Now, when this user creates their content from the Message Box, they will see a Submit For Approval button.
6. The user has the ability to add a message/comment that will be sent to the user from whom they require approval. This user will receive a notification, informing them that they need to either approve or reject the content.

We are excited to announce the launch of several new features ideal for franchise businesses wanting to leverage the power of social media across all of their locations. When developing these new features, we wanted to make it as easy as possible for large chains to manage social media for each of their stores. Learn how Franchisors can manage Multiple Locations with Send Social Media:
1. How to write the same post once and insert custom content for each location
Send Social Media now makes it possible for users to define custom tags that can be assigned at a store/location level or at a social media account level. These custom tags act as placeholders at the time messages/posts are composed and are replaced with actual values at the time the message is actually sent. To define custom merge tags for social media accounts, follow the steps below…
a) Sign into your Send Social Media account and click on My Users.
b) Click “Tags”
c) Create a new custom field/merge tag, by clicking New Field.
d) A new dialog will open up and you’ll be able to enter custom capture information.
e) Select the Category – this is the type of merge tag you will be creating. Options are “Contact”, “User” or “Account” and dictate where these merge tags can be used. For this example, use “Account”.
f) Click Save to add your first merge tag. To add more, repeat the process from c above.

e) Now that you’ve added a few custom tags, you can populate the fields. Since we’ve added Account tags, we can add tags at the account level.
f) To do this, go to Add/Edit Services > My Services. For each of your social network accounts, click the “Tag” button and fill in the relevant information.

g) Now that you’ve added information for each account, you can compose a message and insert merge tags to be replaced with the relevant content at the time your message is sent.
h) Go to the Message Box tab and click “Merge Tags”. You’ll see a dialog window with multiple tags, grouped by category.

i) You can insert tags into your message by clicking on the relevant item from the list.
j) When you’re ready, you can select as many social media services as you like and the merge tags will be replaced with the appropriate content at the time of sending.
2. How to sign off content at the head office before a location publishes content
Head office is often required to approve content before it gets published to a franchise’s social network accounts. Send Social Media’s workflow features make it possible for you to define approval workflows, assign tasks and make sure content is approved and signed off before it gets published to the social web. To create a workflow, follow the steps below:
a) Go to My Users.
b) Click on the user/location in your list who needs approval before content can be published.
c) Under “Approval Workflow”, click “Edit” to be able to define which user needs to approve posts before they get published.
3. How can head office publish content on behalf of a location
Send Social Media’s powerful social media dashboard makes it possible for usrs to share their social network accounts with other users. In the franchise scenario, the head office has the ability to create each of their locations, setup each of their social network profiles and then share these accounts with team members who need to be able to publish to these accounts. The way to set this up using Send Social Media is as follows:
a) After creating your location instances within My Users, switch to each location’s account and setup their social media profiles for them.
b) Once you’ve done this, go to Add/Edit Services > My Services and use the Sharing button to share these services with the head office user.
c) This will allow head office to post updates on behalf of the location from within their Message Box.

4. How can head office access reports across all of their stores/locations
Send Social Media’s social media analytics features provide you with aggregated reports across each of the franchise’s locations. To access printable reports for individual locations or across the entire franchise, you can do this as follows:
a) Go to My Users.
b) Click the Reports button.
c) You’ll see a new dialog window that you can use to print reports.
![]()


Send Social Media makes it easy to import and schedule multiple social media updates at once. The type of message you choose to import could be anything like your regular Tweets or your daily Facebook status updates.
A CSV file is a simple text format commonly used for database tables. Each record in a table is one line of text with each value separated by a comma with no space. Learn how to schedule Multiple Social Media Updates in bulk with Send Social Media:
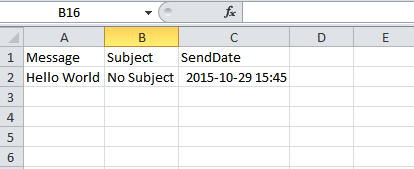
Note: While most text editors, office applications, and database management systems support CSV format, they may not export correct character renderings in a CSV. For instance, depending on a system’s regional settings, Microsoft Excel may use a semicolon as a separator instead of a comma. Be sure to check your application’s defaults before exporting to CSV format. Be sure to use the following date format for the SendDate column: yyyy-MM-dd HH:mm. E.g. 2012-02-24 23:59 for your CSV file.
You can follow the steps below to import the messages using Send Social Media’s message importer:
1) Click on Add/Edit Services > Import.
2) Under CSV importers, click “Add” next to Message Importer.

3) Click “Browse” and select your CSV file.
4) Note that Send Social Media accepts a specific CSV file format as seen below. The column headers “Message”, “Subject” and “SendDate” must be included.
5) Select the group that you want these messages to be distributed to. A group can consist of multiple social network profiles, email address, blogs etc.

One of our most popular new features on Send Social Media, is the ability to resell and offer your own version of our social media marketing platform to your clients.
With our white label social media tool, you have the option to manage social media on behalf of your clients, or train them up and allow them to log in themselves and manage their own social media accounts. Send Social Media is a great tool to help implement a social media strategy for your customers. Why Send Social Media is the perfect Social Media Management Tool for Agencies:
The way the white label site works is as follows:
- We create and host a completely re-branded site for your business/agency – with your own logo, look-and-feel – running on your own website domain, but hosted on our servers.
- We give you a control panel where you can administer your site. From here, you can manage your existing clients and create new logins for your clients.
- Your clients can log in to your white label site themselves and view reports, send social media posts, track mentions etc – or you have the option to manage things for them from your control panel.
- There is a one-off setup fee for the white-label site which includes re-branding and indefinite hosting on our servers.
For more information be sure to contact us

How to Schedule Multiple Social Media Updates in Bulk
Send Social Media makes it easy to import and schedule multiple social media updates at once. The type of message you choose to import could be anything like your regular Tweets or your daily Facebook status updates.
A CSV file is a simple text format commonly used for database tables. Each record in a table is one line of text with each value separated by a comma with no space.
Note: While most text editors, office applications, and database management systems support CSV format, they may not export correct character renderings in a CSV. For instance, depending on a system’s regional settings, Microsoft Excel may use a semicolon as a separator instead of a comma. Be sure to check your application’s defaults before exporting to CSV format. Be sure to use the following date format for the SendDate column: yyyy-MM-dd HH:mm. E.g. 2012-02-24 23:59 for your CSV file.
You can follow the steps below to import the messages using Send Social Media’s message importer:
1) Click on Add/Edit Services > Import.
2) Under CSV importers, click “Add” next to Message Importer.

3) Click “Browse” and select your CSV file.
4) Note that Send Social Media accepts a specific CSV file format as seen below. The column headers “Message”, “Subject” and “SendDate” must be included.

5) Select the group that you want these messages to be distributed to. A group can consist of multiple social network profiles, email address, blogs etc.


We are excited to announce the launch of several new features ideal for franchise businesses wanting to leverage the power of social media across all of their locations. When developing these new features, we wanted to make it as easy as possible for large chains to manage social media for each of their stores. Learn how Franchisors can manage Multiple Locations with Send Social Media:
1. How to write the same post once and insert custom content for each location
Send Social Media now makes it possible for users to define custom tags that can be assigned at a store/location level or at a social media account level. These custom tags act as placeholders at the time messages/posts are composed and are replaced with actual values at the time the message is actually sent. To define custom merge tags for social media accounts, follow the steps below…
a) Sign into your Send Social Media account and click on My Users.
b) Click “Tags”
c) Create a new custom field/merge tag, by clicking New Field.
d) A new dialog will open up and you’ll be able to enter custom capture information.
e) Select the Category – this is the type of merge tag you will be creating. Options are “Contact”, “User” or “Account” and dictate where these merge tags can be used. For this example, use “Account”.
f) Click Save to add your first merge tag. To add more, repeat the process from c above.
e) Now that you’ve added a few custom tags, you can populate the fields. Since we’ve added Account tags, we can add tags at the account level.
f) To do this, go to Add/Edit Services > My Services. For each of your social network accounts, click the “Tag” button and fill in the relevant information.
g) Now that you’ve added information for each account, you can compose a message and insert merge tags to be replaced with the relevant content at the time your message is sent.
h) Go to the Message Box tab and click “Merge Tags”. You’ll see a dialog window with multiple tags, grouped by category.
i) You can insert tags into your message by clicking on the relevant item from the list.
j) When you’re ready, you can select as many social media services as you like and the merge tags will be replaced with the appropriate content at the time of sending.
2. How to sign off content at the head office before a location publishes content
Head office is often required to approve content before it gets published to a franchise’s social network accounts. Send Social Media’s workflow features make it possible for you to define approval workflows, assign tasks and make sure content is approved and signed off before it gets published to the social web. To create a workflow, follow the steps below:
a) Go to My Users.
b) Click on the user/location in your list who needs approval before content can be published.
c) Under “Approval Workflow”, click “Edit” to be able to define which user needs to approve posts before they get published.
3. How can head office publish content on behalf of a location
Send Social Media’s powerful social media dashboard makes it possible for usrs to share their social network accounts with other users. In the franchise scenario, the head office has the ability to create each of their locations, setup each of their social network profiles and then share these accounts with team members who need to be able to publish to these accounts. The way to set this up using Send Social Media is as follows:
a) After creating your location instances within My Users, switch to each location’s account and setup their social media profiles for them.
b) Once you’ve done this, go to Add/Edit Services > My Services and use the Sharing button to share these services with the head office user.
c) This will allow head office to post updates on behalf of the location from within their Message Box.
4. How can head office access reports across all of their stores/locations
Send Social Media’s social media analytics features provide you with aggregated reports across each of the franchise’s locations. To access printable reports for individual locations or across the entire franchise, you can do this as follows:
a) Go to My Users.
b) Click the Reports button.
c) You’ll see a new dialog window that you can use to print reports.
![]()